Thursday, January 28, 2016

Family Challenge - Treasures Pack

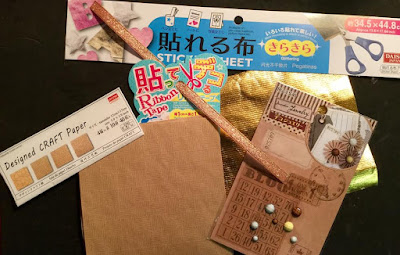
My Mr and I were in Richmond BC recently and we visited the Aberdeen Mall. It is mainly an Asian mall offering all sorts of unique shops and restaurants.  One of my favorite stops is a dollar store.  I comb through all of the exclusive items to see what takes my interest.  This year I scooped several items with the thought to share them with my sister Nina and Sister in Law Judy and issue out a challenge to use all, some or one item to create a card for a healthy little "Family Challenge"


I gathered a few bits of each items into envelopes and mailed them off.

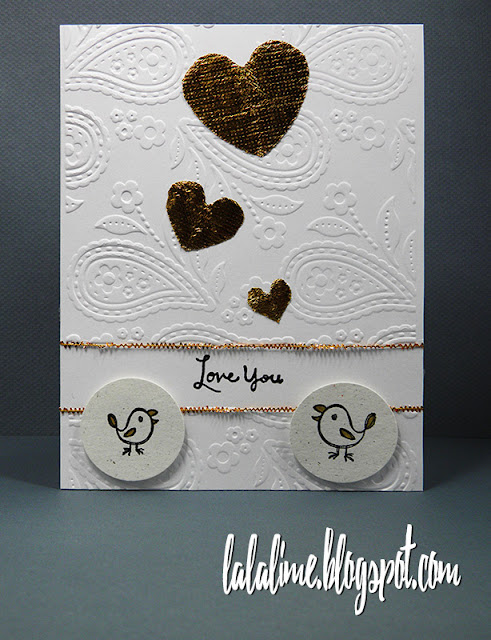
Today is the day we chose to publish our creations.  I made a Valentine's themed card - using only the adhesive gold foil sticker sheet.  I'd originally had a project in mind using the craft paper but I blush to say that I misplaced it somewhere in my craft area. (area 53 haha!)


Recipe:

Stamps - "happy & valentine & day" words - (inside) Stampin' Up
Stamps - Recollections (the two birds) 
Stamp - "Love You" - erm, not sure, package missing
Embossing Folder - Darice
Wink of Stella (birds beaks, wings, tails) 
Hearts - Gold Sticker sheets


I confess I "cased" a card Nina made me a few years ago - a little "hello" card with a twerpy bird on the bottom.  


I hand cut these pretty adhesive gold foil stickers out from the larger sheets, graduating them in size.  Such fun!  

You probably should scoot over to Nina's and Judy's blogs to check out how they used the ingredients from my little surprise package.  

Sure glad you popped by!

Wednesday, January 27, 2016

Tuesday Throwdown 278 Card

Oh how can one resist an "Anything Goes" challenge?  It is like tailored to my day because my brain is so scattered at the moment that "Anything" is right up my alley.


I decided to be VERY adventurous with this card - push all the limits!  


Not a grand photo of my card, but even so... I had a hoot making this.  Supplies are: 

Designer Paper - "Bowties" 6x6 by Basic Grey
Stamp - "Thanks so much" by Paper Smooches
plastic packaging (run through with an embossing folder) 
ribbon
gems
stitching (on a real sewing machine) 
fine tip felt pen
Distress Ink - Tim Holtz
cardstock


The first thing that may have noticed is my card is shiny.  Its because I saved out some plastic packaging from something or other that cycled through our household at Christmas.  I trimmed it then ran it through with an embossing folder (I don't know which one this is though, sorry)  Because the pattern is geometric, I sewed along every second row with my sewing machine, right onto the Designer Paper.  Afterwards I stuck these fun gems in the middle of each.  


I distressed the sentiment, stamped it and then glued the layers together.  I added the gems, drew the flowers on with a fine felt tip pen. Finally I tied the big orange bow, fixed it on, then fixed the sentiment layer on with foam tape.  You might think it looks off kilter by the top photo, but its actually that I have it double bumped out in the middle (doubling the foam tape) then only one layer on each end, so really it is "wowwed" in the middle (humped?)  

I wish you could see and feel this card in real life, its SO fun, bright and cheerful.  And I love re-using things you might normally toss out.  

Thanks so much for stopping in today!  

Tuesday, January 26, 2016

Mojo Monday #432 Card

Oh I seem to be in butterfly mode lately.  Longing for spring perhaps?  It continues to be perma-grey here in the "Sunny" Okanagan.  The snow has melted off (down here in the valley bottom) and I see deer have come to nibble on the apples freshly unthawed.  One day the temps warm, the next they can plunge.  So, I'll make spring happen in my mind and creations because I know with certainty we still have some more wintery days to come in the next months.

I chose this weeks Mojo Monday #432 challenge

A nice square card for a change.  I no longer fear them as I realized (DUH!) to use my trusty Envelope Punch (WeR Memory Keepers)  and can build to suit!  How many times I missed an opportunity. Silly me. 

Here's my card: 


I had a lot of fun with this card!  


SUPPLIES:

Butterfly - fussy cut from a random scrap of DP
Tags and background DP - KI Berry Blast 6 x 6 by Hampton Art
(and butterfly body too - I fashioned it with scissors) 
Gems - Recollections
Stamp - Eloquence by Penny Black
Sparkles - Fairy Dust 
Inks - Versamark and Tim Holtz distress

I drew in the antennae.  I added some nail polish to the wings before sprinking with Fairy Dust.  

Thank you for visiting today! 


Thursday, January 21, 2016

Simon Says Wednesday Card - "Critters"

Wow, I'm fitting in a lot of creating this week, and funnily (is this even a real word?) enough, I'm getting more than ever accomplished too.  My mind is a whirlwind of art, creating, working out and the annual "Its the new year and I need to do a clean sweep of my house).  Well, the working out and clean sweep go together, really, and the creative side gets "rewards" when the goals are met.  Its a win-win.  "They" say that working out actually stimulates your brain and helps!  Just google that and you'll quickly see how it all goes together.

I have cute critter stamps which have been waiting (barking, baaah-ing, meowing) to be used so I decided to go for this week's theme over at

SIMON SAYS WEDNESDAY "Critters" - Jan 21st 

And I think this is the very first time I've ever peeled this amusing little rooster stamp off it's backing.  How sad is that?

I wish I had some Lawn Fawn products or I would have surely used them.


I do know that I'll definately be using him again!  

RECIPE: 

Cardstock
Cuttlebug "chicken wire" embossing folder
Recollections Stamp (rooster)  
BoBunny Stamp (HI) 
TomBow Markers
Sequins
Crochet Cotton
Embossing (for eye and sentiment) 
Versamark Ink

This was one of those cards that just makes up quickly, you know?  The kind that makes you scratch your head and say... there must be something missing.   But I'm happy with it! 

So glad you stopped in today :) 

Wednesday, January 20, 2016

Card for Freshly Made Sketches #220

Working another card (or two) in between the hum-drumness of my day!  Again, the reward system.  Was grrrr at myself for kicking myself out the door first thing (BEFORE) crafting, for a brisk 30 minute walk only to discover half way I forgot to strap my FitBit on my wrist.  Somehow I feel like I got ripped off haha!  At any rate, I drowned my sorrows into

Freshly Made Sketches #220


Thought I'd be brave and work it all up right from the card base.  


Recipe: 

Floral Stamp by Forever in Time, "Get Well Soon" stamp by Hero Arts, Distress Inks by Tim Holtz, Versamark ink, Diamond Accents.  

That little butterfly, you ask?  It is a three layered contraption I cooked up one day experimenting with used dryer sheets.  I ironed one flat, cut three butterflies, painted diamond accents on each b'fly and then sprinkled it with glitter.  I used some wire for the body and antennae and stuck it all together with glue dots. 

I think I will still add a pale pink or white ribbon onto the folded side of this card.  

Thanks for stopping by! 


Tuesday, January 19, 2016

Tuesday Morning Sketches #335 Card

Yeah yeah, I know yesterday was officially "Blue Monday" - and it affects me in a big way and I have to work very hard to dispel the heavy mantle of mid-winterness - full on here in (supposed to be) Sunny Osoyoos BC.  I think I've seen the sun peep out only twice in the the past two weeks.  I feel like I'm wearing dark glasses and my head feels full of cotton and weight presses on my eyes.  I refuse to give in, I make some small manageable goals each day and stick to them.  I can't change the weather but I don't have to be controlled by it either.

One thing which is brings a bit of sparkle into my day and which I thoroughly enjoy is creating - so my reward for reaching my goals in any day is to allow myself to play!  Today I teamed up with my Sister in Law Judy as we took the

Tuesday Morning Sketches #335 Card Challenge 


Lots of scallops and shapes to work with, loving layers too!  


I chose to go with an embossed white background - to be fair I should always mark my folders... I don't know but I think this one is by Elizabeth Craft.  The scallop cuts were created on my Silhouette Cameo.  Both stamps are Stampin' Up.  I embossed the bloom and embossed it with a gold glitter.  


I have been waiting to use these sparkly washi tapes forever and a day... well cloudy, gloomy doomy day was today, and it really did chase my blues away!  I punched the two tiny hearts out of the scraps!  

I wish you sunshine wherever you are (and please send me some too!)  


Friday, January 15, 2016

Freshly Made Sketches #219 Card Challenge

This week's

Freshly Made Sketches #219 Card Challenge caught my eye and so I gifted myself some creative time to put together today's card.

Having my last project be an "Ombre" theme, I wanted to try it for today's card too. 


I kept the design as simple as the sketch but used lots of layering.  Background layer are design papers by My Mind's Eye "Collectable"   I layered on some Tim Holtz distress inks to make the ombre base and then I used this ticket stamp (which had never been opened and was collecting dust) from Forever in Time, stamping it with Versamark and embossing it too.  I trimmed the cardstock, layered it on top of white.  Always nice to have a little border.  


Employed my trusty sewing machine to put some texture to my card and sentiment then glued it to the base.  The ticket layer, I punched in the corner and built the decorative brad using a My Mind's Eye "Collectable decorative brad - looping several bits of crochet cotton (truly its the BEST for projects, it behaves when you tie it etc)  The final touch, adding some sequins (for fun) and then using some foam tape to bump up the feature, the ticket! 

Thursday, January 14, 2016

Simon Says Stamp Wednesday "Ombre" Card Challenge

Oh LA-LA!

I've been just waiting and waiting for a challenge calling for an "Ombre" theme and so I was very excited to find this weeks

Simon Says Stamp Wednesday Challenge "Ombre" (January 13, 2016)

So this is a totally inspired create as I had this concept in my mind all along:


The first step of this was to lay down the Ombre background onto my cardstock with Three shades of Tim Holtz distress inks - "barn door" "ripe persimmon" and "tattered rose".  Next I whipped the rest of  this card together by using this pretty butterfly card cut which I believe is directly from the Silhouette Store.  I used a heavier card-stock.  After I got it all cut and knocked out the bits and pieces I decided that it was rather "flat" looking so I ran it through my Cuttlebug embossing it with a Chevron folder from We R Memory Keepers.  


I thought the little blossoms needed something in the middle so placed a little dollar store gem in the middle of each.  The final touch is this tiny "special" word stamp from Stampin' Up

I hope your eyes enjoyed my card today! 

Tuesday, January 12, 2016

Addicted to CAS 79 Card - and a good tip!

How could one resist making a card with a CAKE theme?  January is such a dull month here (weather wise) that I jump at the chance to celebrate ... anything!  I chose this challenge to perk me up:

Addicted to CAS #79 Card "CAKE" theme - 


I got an idea for CAKE, right off the bat:


Oh I had such fun!  I had some cardboard sitting about and I thought it was the ideal shade and texture for cake, so I cut it to what I felt resembles a generous wedge.  

The next step in is where the good tip comes in - 


This "icing" is actually a mix I dreamed up mixing a small amount (tablespoon or two) of spackle (I used DryDex from the dollar store) and mix it with about 1/2 tsp or more of craft glue (I use Aleene's Tacky glue) and there you have it!  You may have to experiment to get it to the consistency you're happy with and is flexible as well.   I smear that on and let it dry.  Though I did add a goodly sprinkle of Twinkle Dust into the top layer before it dried.  The glue keeps the spackle flexible enough so it does not crack.  So inexpensive and gives me loads of ideas. 

I created the tiny candle out of a snippet of designer paper, a little crochet cotton and the flame is sparkle paper.  I punched a circle out, the trimmed it so that the bottom would be nicely rounded.  I hope this was helpful for you today!

The background is simple - just a bit of  "Flea Market" 6 x 6 by Crate Paper - and I chose the teeniest "Celebrate" stamp by Stampin' Up.


Monday, January 11, 2016

Mojo Monday 430 Card

I had a hankering to reward myself for doing all my chores and tasks today by making a card.  I liked the sketch for today's Mojo Monday:

Mojo Monday #430


I created this card:


For this card I chose two contrasting papers from Crate Paper Flea Market (6 x 6) using it for the blossom too which I cut using MFT Die-Namics.


I added some nice texture to the card base with an embossing folder, dear goodness I don't know which brand.  The final touch is the stamp, again a MFT.

Thank you so much for stopping by!

Thursday, January 07, 2016

MFT Wednesday Sketch Challenge

Yay – after arriving home from Christmas and New Years holidays at the coast with family…


And the beautiful drive home through Manning Provincial Park where I gazed with open mouth at the wonder of every tree glistening in diamond and white fancy (snowflake) dresses.  

And after taking the time to not just put everything from our stuffed suitcases away in their proper places, but cleaning the closets and dressers out first to start the New Year on a positive and productive note – I now feel rested and relaxed and finally, creative! 

So I was excited to see this sketch yesterday - 

MFT Wednesday Sketch Challenge 262


And I made THIS with the sketch in mind.  I tried to think up ways to use one of my MFT stamps on it, but there was not an opportunity so I placed a stamped sentiment on the inside of the card (using My Favorite Things of course!) 

I went with a random 6 x 6 designer paper, cut it at angles and sewed it onto a 5.5 x 4.25 cardstock (which I later bumped up using foam tape).  I cut the Birthday Wishes sentiment and offset on my Silhouette Cameo (a FREE cutting file for you to enjoy!) I have designed it to fit this card size nicely.  Later I wished I might have used some pink ink (distress or otherwise) to create an ombre effect on the sentiment and to soften the brilliant white – though this is probably why it stands out so.


I used punches for these little flags, with two in gold and one in a co-co-ordinating designer paper.  I finished it with a twist of white and gold twine. 

BIRTHDAY WISHES FREEBIE
(text and offset)
for Silhouette cutting machines


download HERE

Hope your week is super creative!


Friday, January 01, 2016

Happy New Years 2016


Wishing all/any of you who wander by my blog a truly happy 2016!  I kind of petered out toward the end of 2015 so I'm not going to make promises of anything because I don't want to set myself up for fail.  It's a nice thought to want to post daily but it's not easy to accomplish.  My blog posts will be sporadic but inspired.  I'd like to include more personal content, besides my creating cards.  I hope you'll come visit when you can. 

My handsome Mr invited me out for a brisk walk today and we went through a nature park.  It was a clear and cold day - 

And was interesting because it was quite frosty in any shady areas while the sunny spots warmed us up all at the same time.  

Such beautiful crystals!  I got lost in my little macro world using the camera on my iPhone. 

Very intrigued with the ice suspended from this log - looks like frosty whiskers.

And I've never seen anything like this ice before - looks just like "angel hair" we used for decoration at Christmas when I was a kid. *I've just done some research online and find this type of ice is called "Hair Ice" and is formed due to a fungus - you can read about it here: http://www.cnet.com/news/candy-floss-ice-spun-by-fungus/


I wanted to include this photo that Mr. Miles took - these Salal leaves rimed with ice crystals. 

I hope you've enjoyed these snippets of our first day this year! 

Total Pageviews

Popular Posts